Rally Course Designer Software
by SinisterLabs.com
Aligning Signs
When it was first put together, the alignment of signs wasn't working very well.
Since then, it has improved greatly, but you need to understand how it works to use the feature to its fullest.
The first concept is that each sign (except Start and Finish) has a default Incoming and an Outgoing Connection Point.
The Incoming Connection Point defines what corner or edge the arrow coming into this sign connects.
Similarly, the Outgoing Connection Point defines the corner or edge that the arrow coming out of this sign connects.
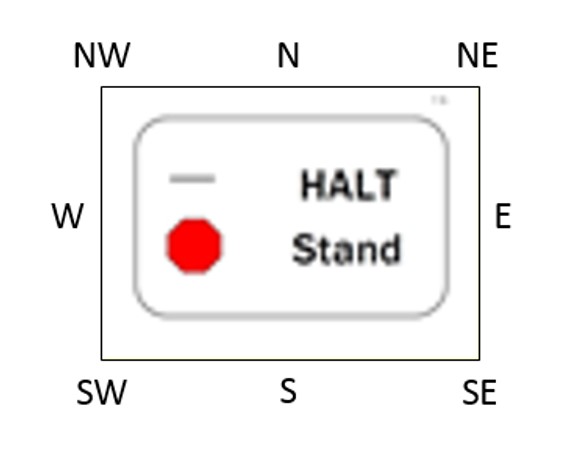 Connection Points are represented by one or two-characters that represent the points on a compass.
N, S, E and W means the arrow connects with an edge of the sign, NE, NW, SE and SW means the arrow connects with a corner.
You can see this in the picture here.
Connection Points are represented by one or two-characters that represent the points on a compass.
N, S, E and W means the arrow connects with an edge of the sign, NE, NW, SE and SW means the arrow connects with a corner.
You can see this in the picture here.
I use the term default to mean the point the arrow will be connected with when the sign is first added to the course.
Every sign (again, except Start and Finish) has default incoming and outgoing points.
Every sign also has associated with it an angle that defines what direction the sign behind that sign should be placed (the Exit Angle).
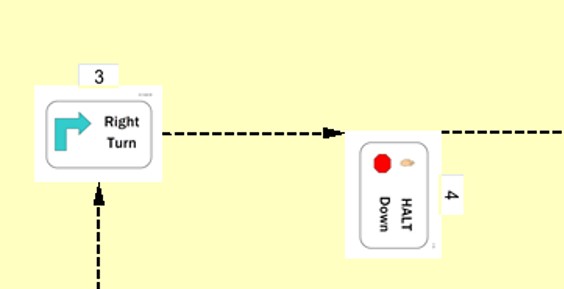 When a sign is added, the sign is rotated such that the incoming arrow will come in from the South.
When a sign is added, the sign is positioned relative to the exit angle of the sign before it.
For example, in the picture to the left, sign #4 was added after the Right Turn.
Sign #4 was rotated so that the arrow coming from sign #3 comes in from the South of sign #4.
Because the exit angle of the arrow coming out of sign #3 is 90°, sign #4 ends up tilted 90° to the right.
When a sign is added, the sign is rotated such that the incoming arrow will come in from the South.
When a sign is added, the sign is positioned relative to the exit angle of the sign before it.
For example, in the picture to the left, sign #4 was added after the Right Turn.
Sign #4 was rotated so that the arrow coming from sign #3 comes in from the South of sign #4.
Because the exit angle of the arrow coming out of sign #3 is 90°, sign #4 ends up tilted 90° to the right.
But another important point about this picture is that sign #4 is positioned such that its incoming connection point aligns directly with sign #3's outgoing connection point.
Had sign #3 been rotated at a different angle, sign #4's incoming connection point would still have been aligned such that the arrow coming out of sign #3 would point out of the right side of sign #3.
This would be true even if sign #3 was rotated to, say, 30° of off North.
Signs are inserted a reasonable distance from the sign before them.
This is different for different screen resolutions; signs will be positioned further away on screens with lower resolutions.
In some cases, a sign may want to appear off the course map area.
When this happens, the sign is instead positioned half way off the edge of the course, but never completely off it.
It's likely in a case like this that you'll want to reposition both signs before continuing.
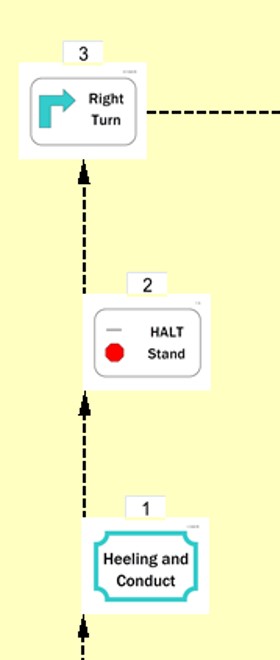 Now have a look at the next picture.
Notice how signs #1 and #2 appear offset to the right of the arrows connecting them.
Most Rule Set Files are set up so that signs like these will appear to the right of the arrows.
This is consistent with the concept that the team's direction of travel will cause them to pass these kind of signs with the sign to their right,.
So the course map is drawn this way as a visual cue to the handler - pass this sign with it to your right.
The Right Turn sign that follows, however, is one of the kind of signs that teams don't really pass by.
Instead, they walk directly toward that sign, but veer to the right just before reaching it.
So, the incoming connection point for the Right Turn comes in at the South point and it leaves to the East.
Again, this is a visual cue to the team - approach this sign with it directly in front of you.
Now have a look at the next picture.
Notice how signs #1 and #2 appear offset to the right of the arrows connecting them.
Most Rule Set Files are set up so that signs like these will appear to the right of the arrows.
This is consistent with the concept that the team's direction of travel will cause them to pass these kind of signs with the sign to their right,.
So the course map is drawn this way as a visual cue to the handler - pass this sign with it to your right.
The Right Turn sign that follows, however, is one of the kind of signs that teams don't really pass by.
Instead, they walk directly toward that sign, but veer to the right just before reaching it.
So, the incoming connection point for the Right Turn comes in at the South point and it leaves to the East.
Again, this is a visual cue to the team - approach this sign with it directly in front of you.
Course maps may be constructed with either of two different options.
What is described above is the option to Insert Signs Relative to the Selected Sign.
Another option is provided, which will place the new sign exactly half way between the selected sign and the sign next to the selected sign.
The new sign will be rotated such that it points from the sign that proceeds it to the sign that follows it.
This option will disregard the connection points.
For the most part, this option is much less desirable than inserting relative to the selected sign.
But, you are welcome to try it out.
Once signs are placed on the course map, you still might end up moving them around.
In doing so, you'll like throw off the alignment.
It's still possible to re-align signs by right-clicking on one and selecting the Align... option.
This will present you with a list of the signs on the course.
Highlight each sign that you want to align relative to the selected sign and press Continue.
With signs close to the position you want them, using this little tool puts them just where they belong.